Creating any SSL certificate requires a unique Certificate Signing Request (CSR). This article will show you how to submit a CSR and provide the other information needed to create your certificate.
- Your CSR is really just a highly specialized text file. You will be copying and pasting the text from your CSR, so you may want to have it open in your favorite text editor before beginning this process. For specific instructions on generating a CSR on your server platform, please see our FAQ listing CSR generation articles.
- The Dashboard tab in your SSL.com account portal will display an alert when you have purchased a certificate but have not yet submitted the CSR for that certificate:

Please contact SSL.com if you have any issues with your account credits.
Steps When Submitting Your CSR
Submit the CSR
1. After placing a certificate order, you should find an unused SSL certificate credit with a waiting for csr status in your SSL.com account portal. This can be found either by clicking the link in the alert shown above, or in the Orders tab. Click finish processing or submit csr (they both go to the same place).
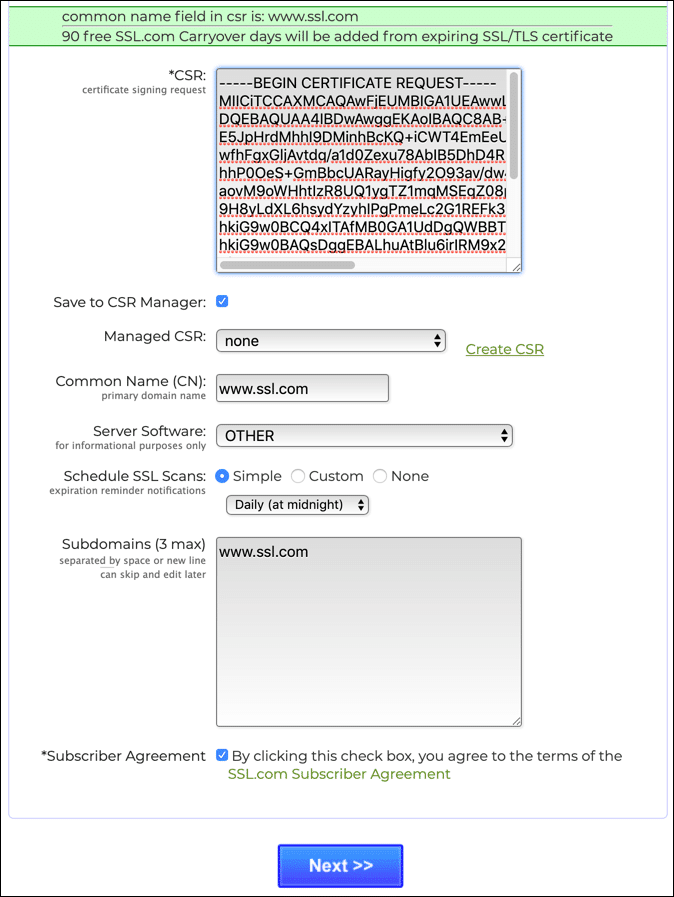
2. On the page that appears, scroll down and copy and paste the text of your CSR into the CSR field. If you would like to save your CSR for reuse at a later date, check the Save to CSR Manager box. Optionally, you may also specify your server software via the Server Software drop-down, schedule SSL scans, and/or add any desired subdomains for multi-domain certificates at this point. Review the SSL.com Subscriber Agreement and check the Subscriber Agreement checkbox if you agree. When you are finished, click the Next>> button.
Enter Contact Information
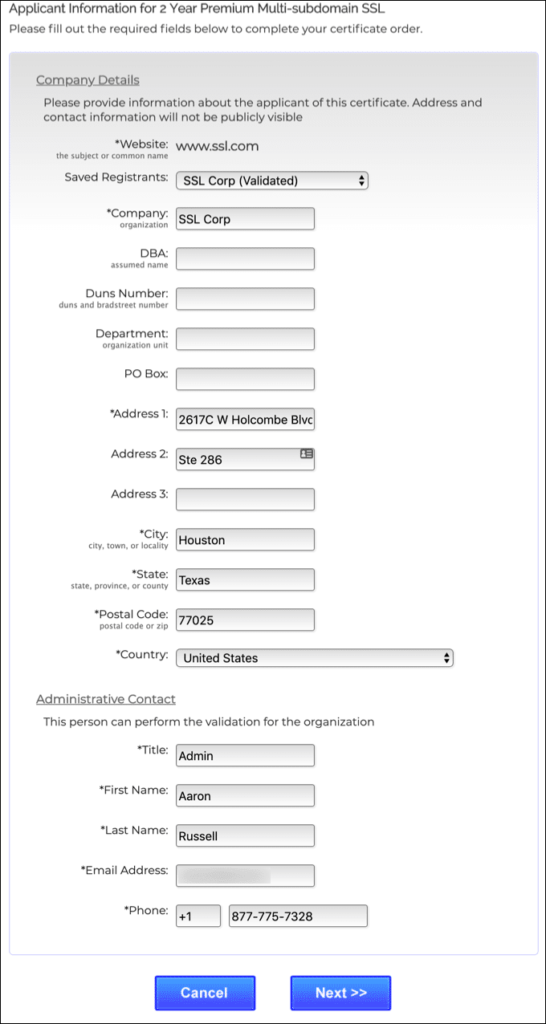
3. Confirm that the domain name is correct on the certificate request, and enter company and administrative information as requested. If you have saved contact information from previous orders, you can use the Saved Registrants drop-down to fill the form. Click the Next>> button when you are finished entering information.
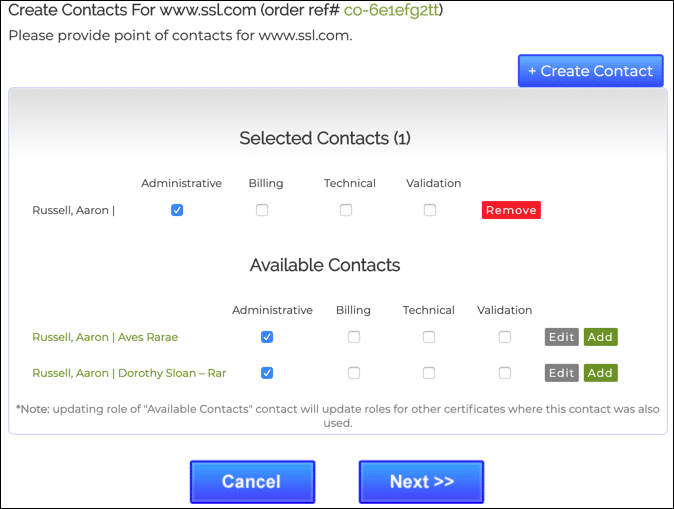
4. Next, add any additional contacts for Administrative, Billing, Technical, and/or Validation roles. You can select from previously-saved contacts or add a new contact by clicking the + Create Contact button. To use a saved contact, click the green Add button at the right of its row under Available Contacts. When you are finished assigning roles, click the Next>> button.
Choose a Validation Method
5. Next, the Domain Validation screen will appear:
6. Choose your Domain Validation (DV) method. Three methods are available: Email Address, HTTP CSR Hash, and CNAME CSR Hash.Use the clickable tabs below for information on how to validate your domain with each of the three methods:
Email Address Validation Method
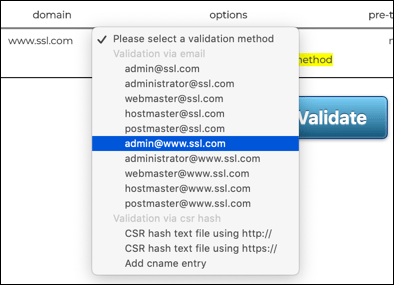
1. Choose an email address from the Please select a validation method drop-down menu. Only addresses that are acceptable for validation will be available. These are:
- webmaster@
- hostmaster@
- postmaster@
- administrator@
- admin@
- Domain contacts (domain name registrant, technical contact, or administrative contact) listed in the base domain’s WHOIS record.
2. Click the Validate button.
3. You will receive an email with a validation link. Click the link.
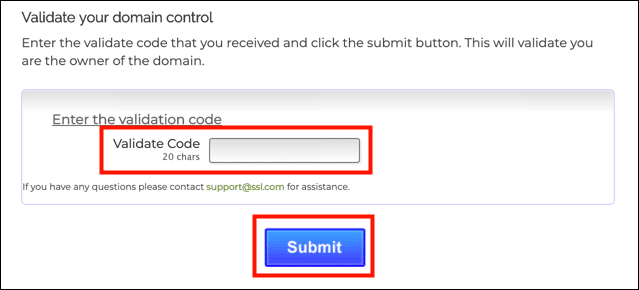
4. Enter the validation code from your email in the page that opens in your web browser and click the Submit button.
HTTP CSR Hash Validation Method
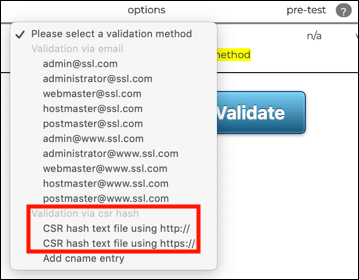
1. The HTTP CSR Hash method requires that you have the ability to create a file on the web server that is to be protected. To get started, choose one of the two options under Validation via csr hash on the Please select a validation method drop-down menu:
- If you are already running an HTTPS web server, choose CSR hash text file using https://.
- If your web server is only currently offering HTTP, choose CSR hash text file using http://.
2. click the THIS FILE link and download the validation hash file. The file is also available in the link under validation hashes, further up on the screen.
3. Create a directory at the root level of the domain the certificate is intended to protect on your web server named .well-known/pki-validation/ (if it does not exist already), and upload the CSR hash file to this directory. The file must be accessible via HTTP on port 80, or via HTTPS on port 443. The file cannot be altered in any way or reached via redirection or other .htaccess directives. In the example shown here, we would make the file available at the URL https://www.ssl.com/.well-known/pki-validation/935832BD551BED2CDC17B22EBEA7D178.txt. As seen in the screenshot above, the exact instructions for where to upload your file will be shown below the validation method drop-down after selecting a CSR hash text option.
4. Click the Validate button.
5. Click the OK button on the dialog box that appears.
CNAME CSR Hash Validation Method
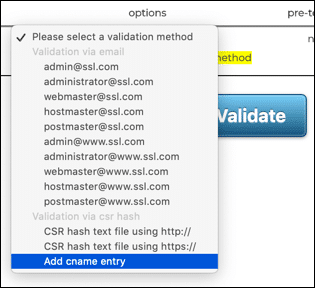
1. The CNAME CSR Hash method requires that you have the ability to create a CNAME entry in the DNS record for the domain that is to be protected. To get started, choose one of the two options under Add cname entry on the Please select a validation method drop-down menu.
2. Create a CNAME entry as shown in the instructions that appear under the drop-down menu. In this case, we need to point _935832BD551BED2CDC17B22EBEA7D178.www.ssl.com to 5CDA3B73E904D0FB2EAA0D0611EB84C3.5B49D3DF648BE0F891E6794084C5A36E.db32d494ad.ssl.com. Please refer to your web host’s documentation for information on creating the CNAME record, as the method will vary from platform to platform.
3. After creating the CNAME entry, click the Validate button.
4. Click the OK button on the dialog box that appears.
Monitor for Validation
7. When you have submitted your CSR the status for that certificate will change to pending validation. You can monitor the status of any certificate order through the Orders tab of your SSL.com account portal. You will be notified when your certificate is ready for installation.
Need more resources for your SSL.com account? Check out the links below:
- Failed Pre-test?!
- Your SSL.com Account – Validations
- Your SSL.com Account – Orders
- SSL.com’s SWS API – Introduction
- Your SSL.com Account – Domains
- SSL/TLS Certificate Issuance and Revocation with ACME
- Supported Cloud HSMs for Document Signing and EV Code Signing


