By enabling Windows 10’s Linux subsystem, you can now easily access many useful open-source tools (like OpenSSL) on Windows. This how-to will walk you through checking your version of Windows for compatibility, enabling the Linux subsystem, and installing and updating a Linux distribution (Ubuntu).
For more helpful how-tos and the latest in cybersecurity news, subscribe to SSL.com’s newsletter here:
Step 1: Check Windows Version
-
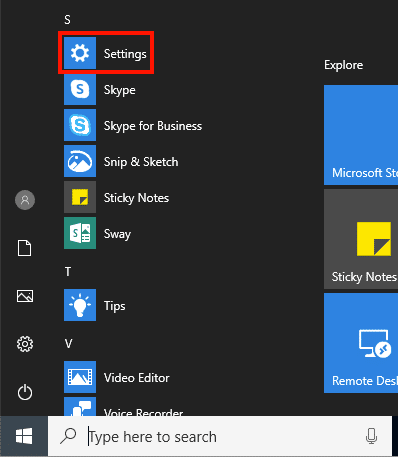
First, make sure that you’re running a compatible version of Windows 10. You’ll need version 1709 or greater to run the Linux subsystem. To check this, go to Start Button > Settings.

-
Click System.
-
Click About (you may need to scroll down).
-
Scroll down to view the version of Windows 10 you are running.
Step 2: Enable Linux Subsystem
-
Begin typing “Turn Windows features on and off” into the Start Menu search field, then select the control panel when it appears.
-
Scroll down to Windows Subsystem for Linux, check the box, and then click the OK button.
-
Wait for your changes to be applied, then click the Restart now button to restart your computer.
Step 3: Install and Update Ubuntu Linux
-
Now we’re going to actually install a Linux distribution. Go to Start Button > Microsoft Store.
-
To see the available Linux distributions, type “Linux” into the search field, then click Run Linux on Windows.
-
Click the Linux distribution you’d like to install. In this how-to we’re going to choose Ubuntu.
-
Click the Get button.
-
Windows will download and install Ubuntu. When it’s finished, click the Launch button.
-
A terminal window will appear. Wait for Ubuntu to finish installing, then create a new Linux username and password when prompted. You’re now at your new Linux command line!
-
Now is a good time to make sure that your installed software is up to date. In Ubuntu, you can use the
apt-getcommand to update all packages automatically. (If you installed a different Linux distribution, you should check its documentation for how software updates are handled — this process varies significantly between distributions.) First, we’ll update the package lists. Enter the command below (note that you must usesudoand enter your password to run the command as an administrator):sudo apt-get update [sudo] password for aaron:
-
Ubuntu will connect to its repositories and download a series of package lists. When it is finished, use
apt-getagain to upgrade all packages to their latest versions.sudo apt-get upgrade
-
A list of packages to be upgraded will be shown. Enter
Yat the prompt to continue with installation. -
Ubuntu will now download and install the packages. This process will probably take at least a few minutes to complete, depending on your connection speed and how many packages need to be upgraded. You may also be prompted as to whether you want services to be automatically restarted during package installations (we’re picking “Yes” for convenience here, but it’s not required).
-
Finally, run this command to check dependencies and delete obsolete packages from the system (depending on how long the previous step took, you may have to enter our password again):
sudo apt-get dist-upgrade
-
Again, enter
Yat the prompt to install the listed packages. -
You’re all finished installing and updating Ubuntu Linux! You can launch a Linux terminal at any time by selecting Ubuntu from the start menu. Now that you have Linux installed on your system, you can start using OpenSSL to do things like generate a CSR and create or extract certificates and private keys from PKCS#12/PFX files.