Introduction
Microsoft Intune allows for the integration of imported PFX certificates, which are often used for S/MIME encryption in email profiles. Intune supports the import of PFX certificates across these platforms:- Android device administrator
- Android Enterprise:
- Fully Managed
- Corporate-Owned Work Profile
- Personally-Owned Work Profile
- iOS/iPadOS
- macOS
- Windows 10/11
Understanding S/MIME Certificate Deployment Using Intune
When Intune is used to deploy an imported PFX certificate to a user, two key components play a role alongside the device:- Intune Service: This service securely stores the PFX certificates in an encrypted format and manages their deployment to the user’s device. The passwords that protect the private keys of these certificates are encrypted before being uploaded, using either a hardware security module (HSM) or Windows Cryptography. This ensures that Intune never has access to the private keys.
- Certificate Connector for Microsoft Intune: When a device requests an imported PFX certificate, the encrypted password, certificate, and device public key are forwarded to the connector. The connector decrypts the password using the on-premises private key, then re-encrypts the password with the device key. The certificate is then returned to Intune, which delivers it to the device. The device decrypts it with its own private key and installs the certificate.
Specific Roles of Actors
- Entra ID: Functions as the main identity provider, integrating with various Microsoft services and enterprise applications.
- Intune: Manages devices that are enrolled in the system, applies security policies, and deploys certificates.
- S/MIME Certificates: Provided by SSL.com, these certificates ensure secure email communication through encryption and email signing.
- Entra Connect: Links on-premises Active Directory with Azure Entra ID to provide a hybrid identity solution.
- Devices: These are enrolled in Intune and secured with certificates, giving users safe access to corporate resources.
Workflow Summary
- The organization registers their enterprise app in Entra ID.
- The enterprise app details are also registered with SSL.com.
- Intune administrators purchase certificates for users from SSL.com.
- During the purchase, the administrators select the purpose of the certificate, such as general use, S/MIME Encryption, or S/MIME Signing.
- The PFX certificate is then imported into Intune for the user’s account.
- Intune connects with the Intune connector to validate the certificate.
- Once validated, Intune deploys the certificate to the user’s device.
Strengthen your email security and protect sensitive data with SSL.com S/MIME certificates.
How to Configure Microsoft Intune and Microsoft Active Directory for S/MIME Certificates
Prerequisites
Listed below are the prerequisites for the API. These need to be configured on the Intune tenant to which certificates will be imported from SSL.com.- An account with Intune Administrator rights
Add users and grant permissions – Microsoft Intune | Microsoft Learn - All the users for whom the PFX certificate is imported should have Intune license assigned
Assign Microsoft Intune licenses | Microsoft Learn - Intune certificate connector installed and configured on a Windows server
Install the Certificate Connector for Microsoft Intune – Azure | Microsoft Learn - Public key exported from Intune connector server
Use imported PFX certificates in Microsoft Intune | Microsoft Learn - Create Enterprise application in Microsoft Entra
This guide assumes that the Enterprise app will already be created at the tenants and SSL.com will have the information about the registered enterprise app. The process to register the Enterprise app (using Entra portal) is explained below.- Login to portal.azure.com and search for Microsoft Entra ID
- Click Enterprise applications
- Click New application
- Click Create your own application
- Enter the name of the application and click Create
- Application is now created successfully.
- Click App registrations
- Click All applications
- Select the Application.
Note the Application ID and the Directory ID: these need to be passed to API. - Click Certificates & secrets and then select New client secret
- Click Authentication and add the Web Redirect URLS of SSL.com. Redirect URLs are https://secure.ssl.com/oauth2/azure for Production and https://sandbox.ssl.com/oauth2/azure for Sandbox
- Provide a name to the key and click Add
Note the value of the Key. This needs to be passed to the API.
- Set up a PKCS certificate import profile
Once the certificates are imported into Intune, configure a PKCS certificate import profile and assign it to relevant Microsoft Entra groups. Detailed steps are available in this Microsoft guide.
Permission requirements for Enterprise application to import the certificate
- Under App registrations >> application name, click API Permissions.
- Click Add a permission.
- Click Microsoft Graph.
- Click Delegated Permissions and search for user.read. Check the boxes for User.Read and User.Read.All.
- Click Delegated permissions and search for “group”. Check the box for Group.ReadWrite.All.
- Click Delegated Permissions and search for “DeviceManagementApps”. Check the box for DeviceManagementApps.ReadWrite.All.
- Search for “DeviceManagementConfiguration”. Check the boxes for DeviceManagementConfiguration.Read.All and DeviceManagementConfiguration.ReadWrite.All. Proceed to click the Add permissions button.
- Click Add a permission.
- Select Microsoft Graph.
- Click Application permissions and search for “user.read”. Check the boxes for User.Read.All and User.ReadWrite.All.
- Click Application permissions and search for “group”. Check the box for Group.ReadWrite.All.
- Click Application permissions and search for “deviceManagementApps”. Check the box for DeviceManagementApps.ReadWrite.All
- Click Application permissions and search for “DeviceManagementService”. Check the box for DeviceManagementService.ReadWrite.All
- Search for “DeviceManagementConfiguration” and check the boxes for DeviceManagementConfiguration.Read.All and DeviceManagementConfiguration.ReadWrite.All. Proceed to click the Add Permissions button.
- Once all the rights are assigned, click Grant admin consent for [name of organization].
- Click Yes to grant the permission
- The permission should now be granted successfully.
How to Export Certificates to Azure Active Directory Using SSL.com Azure Integration Tool
The following sections provide instructions on how to use the SSL.com Azure Integration Tool to export certificates to Azure Active Directory.Requirements from SSL.com
- An active Bulk Ordering Identity Pre-Validation Agreement. Instructions can be found in this guide. Once activated, the steps in the next section can be performed.
- Configured Microsoft Entra and Intune account, as described in this previous section: How to Configure Microsoft Intune and Microsoft Active Directory for S/MIME Certificates.
Configure Azure Sync
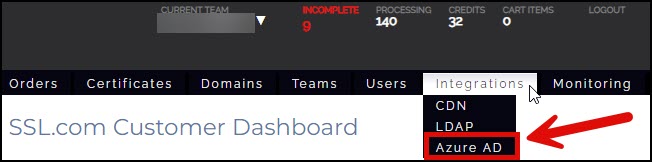
- Login to your SSL.com account and click Integrations on the top menu. From the listed options,, click Azure AD.
- Fill out the required fields for Azure integration. Afterwards, click the Save button.
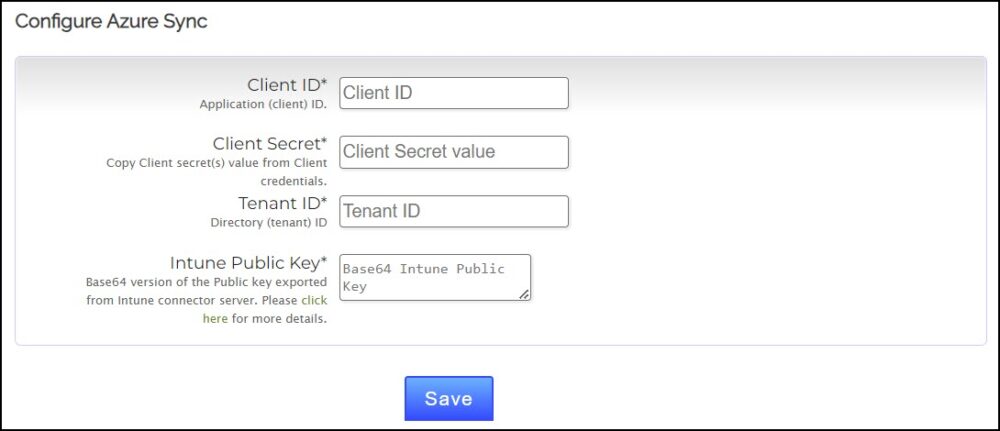
- Client ID. Application (client) ID.
- Client Secret. Copy client secret(s) value from client credentials.
- Tenant ID. Directory (tenant) ID.
- Intune Public Key. Base64 version of the Public key exported from Intune connector server. For more details, check out this Microsoft resource.
Use the SSL.com Azure Integration Tool for Issuance of S/MIME certificates
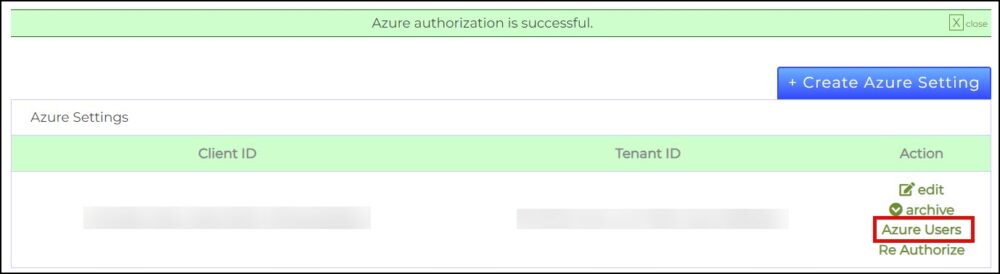
- Once the Azure setting has been created. Click the Authorize link.

- Click Azure Users so that the list of users from Azure can be imported to SSL.com’s system.
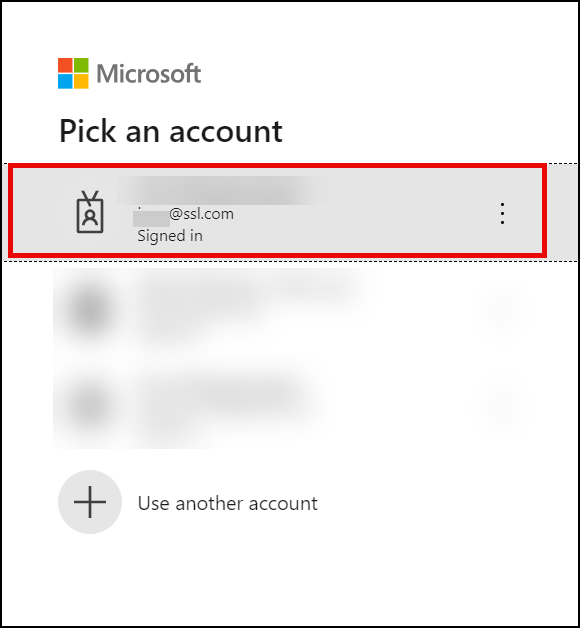
- You will be prompted to login to your Microsoft account.
- Click the Import Users button on the SSL.com Azure Integration Tool.

- SSL.com will notify that the information of the Azure users who will be assigned digital certificates are in process of being imported. Reload the page to confirm that these have been imported.
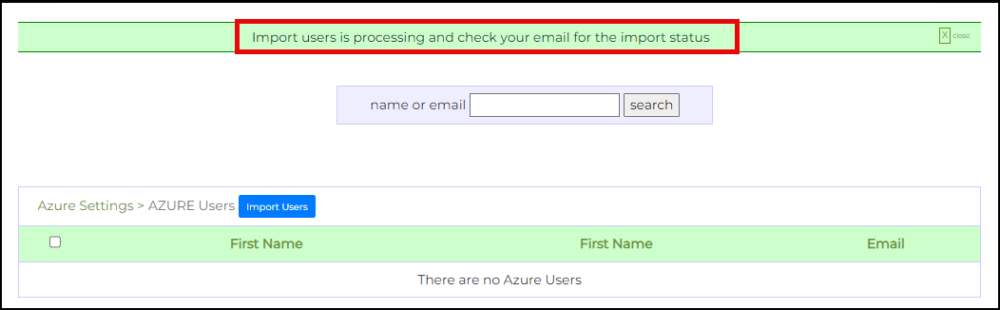
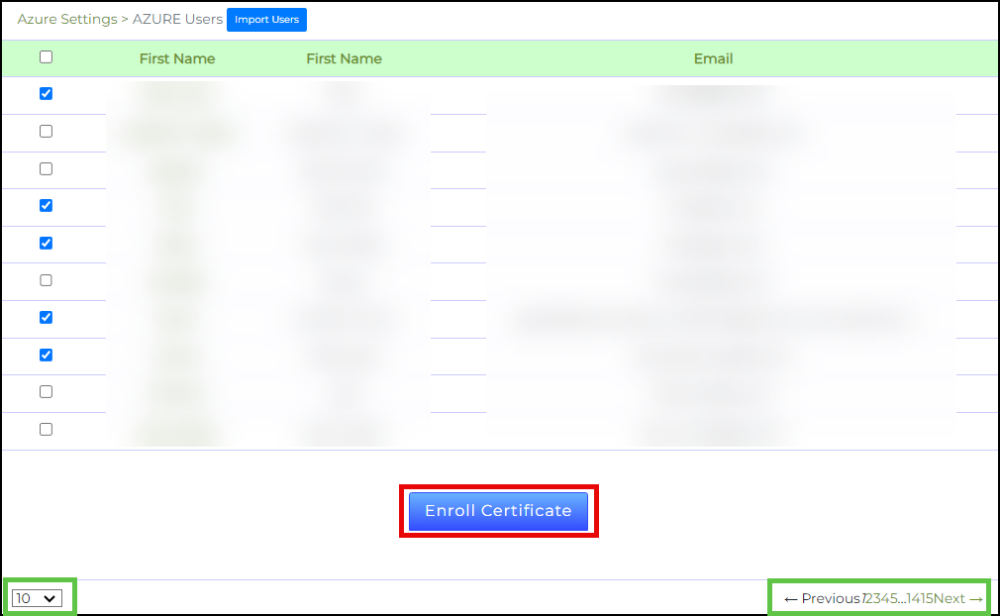
- SSL.com will show the list of Azure users, indicated by their first name, last name, and email address. Tick the check box for all the users that will be assigned with a certificate. The amount of users displayed in the list can be increased by clicking the drop-down arrow at the lower-left of the page. Upon finalization of selected users, click the Enroll Certificate button to proceed.
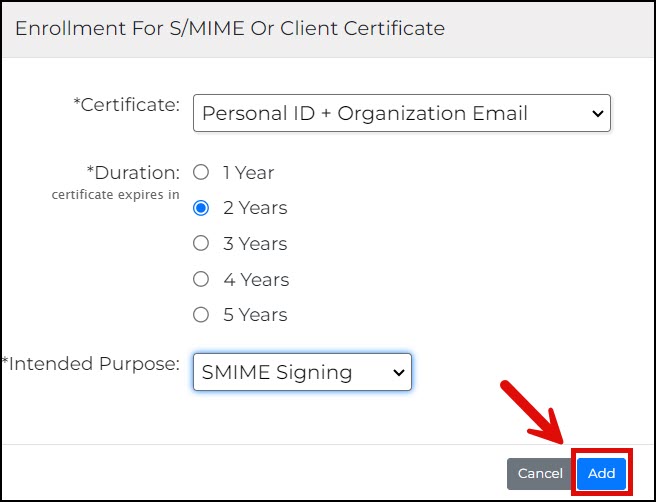
- Accomplish the requirements for the certificate.
- Certificate: Choose the type of certificate you want to assign for the selected users.
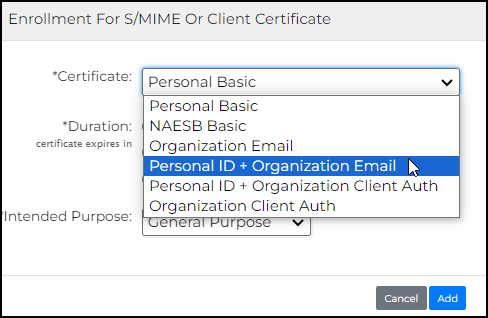
- Duration: Specify the length of time before the certificate expires.

- Intended Purpose: Choose among General Purpose, SMIME Encryption, or SMIME Signing.
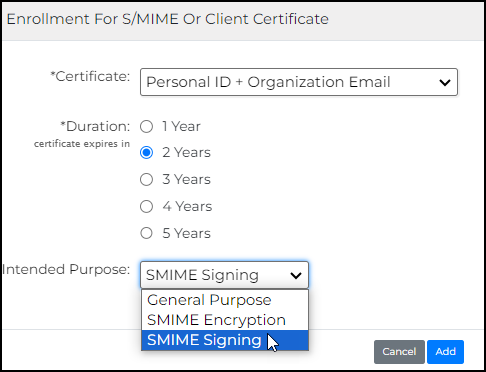
- After the choices are finalized, click the Add button.
- Certificate: Choose the type of certificate you want to assign for the selected users.
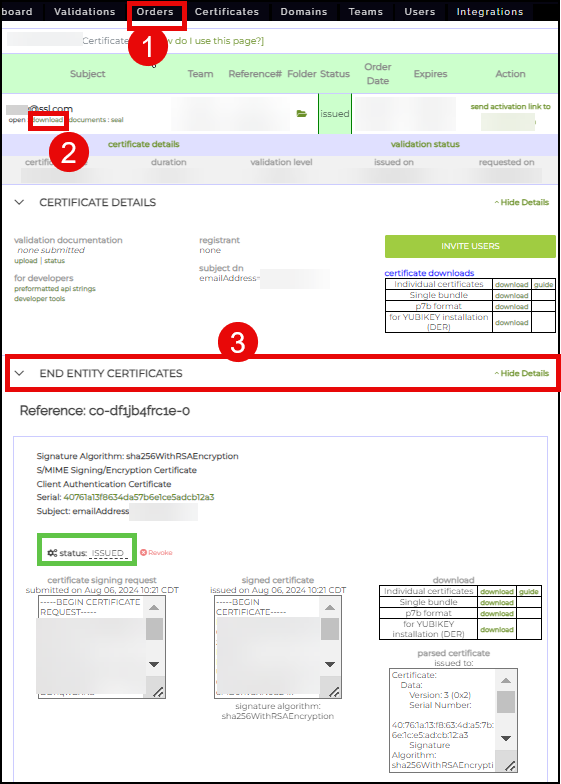
- Each user will be assigned a new certificate order from here. With the presence of an Identity pre-validation agreement, each order will be auto-validated and issued. The successful issuance of the certificate can be confirmed by clicking Orders from the top menu, followed by the details link of the particular order. By scrolling down and clicking the END ENTITY CERTIFICATES section, the details of the certificate will appear including its ISSUED status.